
AI 🤖 is getting so good..
You can’t trust anything you see on the Internet.
You have to think critically about all the information and always be skeptical.
You know, what we should have ALWAYS BEEN DOING; since time immemorial!
😁
AI 🤖 is getting so good..
You can’t trust anything you see on the Internet.
You have to think critically about all the information and always be skeptical.
You know, what we should have ALWAYS BEEN DOING; since time immemorial!
😁
If you’re changing the user & group ownership to the SAME person..
You can streamline it from 2 commands:
chown ray /var/tmpFile
chgrp ray /var/tmpFile
To 1 command, only typing the username once:
chown ray: /var/tmpFile

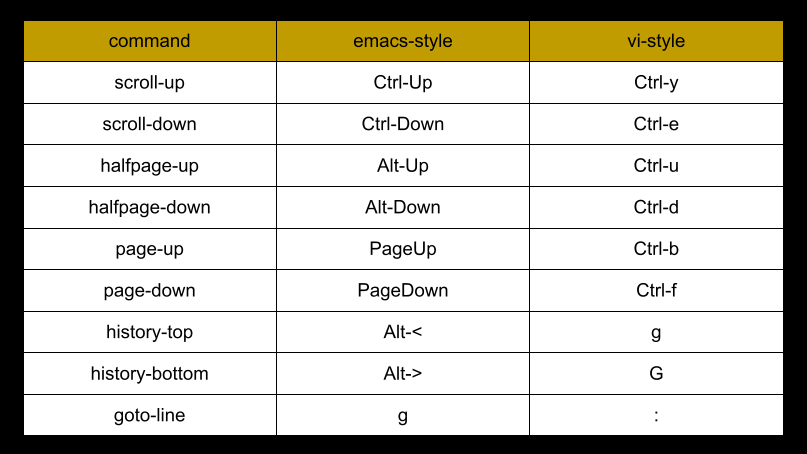
Using TMUX but can’t scroll your output? This video is for you!
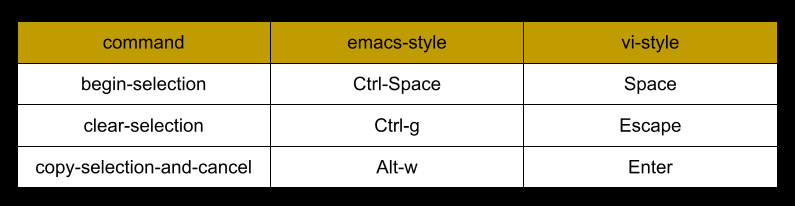
Here we introduce TMUX’s Copy Mode.
Copy Mode is how you
# Display current value for option 'mode-keys'
show-options -g mode-keys

# Set to vi-style key bindings
set-option -g mode-keys vi

# Set to emacs-style key bindings
set-option -g mode-keys emacs
# Set key binding mode to vi OR emacs
set-option -g mode-keys vi
set-option -g mode-keys emacs
# List emacs key bindings
list-keys -T copy-mode C-r
list-keys -T copy-mode C-s
# List Vi key bindings
list-keys -T copy-mode-vi ?
list-keys -T copy-mode-vi /
list-keys -T copy-mode-vi L
list-keys -T copy-mode-vi M
list-keys -T copy-mode-vi H
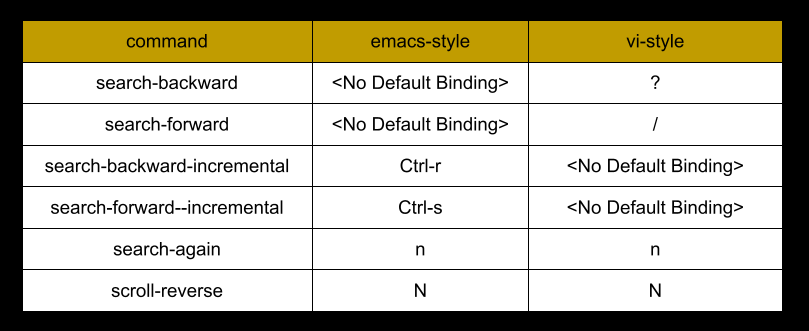
# Redefine Vi searching
bind-key -T copy-mode-vi ? command-prompt -i -I "#{pane_search_string}" -p "(search up)" "send -X search-backward-incremental \"%%%\""
bind-key -T copy-mode-vi / command-prompt -i -I "#{pane_search_string}" -p "(search down)" "send -X search-forward-incremental \"%%%\""
# Redefine Emacs commands:
# bottom-line
# middle-line and
# top-line
bind-key -T copy-mode L send-keys -X bottom-line
bind-key -T copy-mode M send-keys -X bottom-line
bind-key -T copy-mode H send-keys -X bottom-line
Are you new to Vim but every time you launch it..
Exiting feels like trying to escape a blackhole! 🌌🚀
I just launched my Vim Crash Course and it will show you how to edit files, never get lost, and exit once and for all. 😌
https://stan.store/raychavez/p/vim-crash-course-for-linux-users
The following options are from TMUX version 3.2a
You can view the details of each option in the tmux man page
man tmux
backspace
buffer-limit
command-alias[0]
command-alias[1]
command-alias[2]
command-alias[3]
command-alias[4]
command-alias[5]
copy-command
default-terminal
editor
escape-time
exit-empty
exit-unattached
extended-keys
focus-events
history-file
message-limit
set-clipboard
terminal-overrides
terminal-features[0]
terminal-features[1]
user-keys
activity-action
assume-paste-time
base-index
bell-action
default-command
default-shell
default-size
destroy-unattached
detach-on-destroy
display-panes-active-colour
display-panes-colour
display-panes-time
display-time
history-limit
key-table
lock-after-time
lock-command
message-command-style
message-style
mouse
prefix
prefix2
renumber-windows
repeat-time
set-titles
set-titles-string
silence-action
status
status-bg
status-fg
status-format[0]
status-format[1]
status-interval
status-justify
status-keys
status-left
status-left-length
status-left-style
status-position
status-right
status-right-length
status-right-style
status-style
update-environment[0]
update-environment[1]
update-environment[2]
update-environment[3]
update-environment[4]
update-environment[5]
update-environment[6]
update-environment[7]
visual-activity
visual-bell
visual-silence
word-separators
aggressive-resize
allow-rename
alternate-screen
automatic-rename
automatic-rename-format
clock-mode-colour
clock-mode-style
copy-mode-match-style
copy-mode-current-match-style
copy-mode-mark-style
main-pane-height
main-pane-width
mode-keys
mode-style
monitor-activity
monitor-bell
monitor-silence
other-pane-height
other-pane-width
pane-active-border-style
pane-base-index
pane-border-format
pane-border-lines
pane-border-status
pane-border-style
remain-on-exit
synchronize-panes
window-active-style
window-size
window-style
window-status-activity-style
window-status-bell-style
window-status-current-format
window-status-current-style
window-status-format
window-status-last-style
window-status-separator
window-status-style
wrap-search
xterm-keys
allow-rename
alternate-screen
remain-on-exit
synchronize-panes
window-active-style
window-style
Bash’s default is to use these Emacs-style commands:
###################
#
# Control Modifier
#
###################
# Move up your command history
ctrl-p
# Move down your command history
ctrl-n
# Move back one character at a time
ctrl-b
# Move forward one character at a time
ctrl-f
# Front of the line
ctrl-a
# End of the line
ctrl-e
# Delete one character at a time
ctrl-d
# Backspace one character at a time
ctrl-h
# Delete everything after the cursor, including underneath (inclusive)
ctrl-k
# To delete everything before the cursor (exclusive)
ctrl-u
###############
#
# Alt Modifier
#
###############
# Move back one word at a time
alt-b
# Move forward one word at a time
alt-f
# Delete a word at a time
alt-d
# Backspace one word at a time
ctrl-w
Here’s the source code for the bash function and PS1 variable:
# Bash function
my_git() {
GIT_BRANCH=$(git branch --all 2> /dev/null | egrep "^\*" | cut -d ' ' -f 2 )
if [[ -z "$GIT_BRANCH" ]]; then
       echo "" #not in a Git repo
else
    if [ $(git status | egrep "^Untracked" -c) -ge 1 ]; then
        #ANSI code: Red
        echo -e "(\033[0;31m$GIT_BRANCH\033[0m) "
    elif  [ $(git status | egrep "^Changes" -c) -ge 1 ]; then
        #ANSI code: Yellow
        echo -e "(\033[0;33m$GIT_BRANCH\033[0m) "
    else
        #ANSI code: Green
        echo -e "(\033[0;32m$GIT_BRANCH\033[0m) "
    fi
fi
}
# PS1 variable:
export PS1="\[\e]0;\u@\h: \w\a\]\u@\h:\w$ \$(my_git)"
List of commands from video demo:
# view current state of your repo
git status

# initialize a brand new repo
git init

# set global setting
git config --global user.name "Ray"
git config --global user.email "ray@github.com"

# view global settings
git config --global user.name
git config --global user.email

# stage all files
git add *

# quickly commit staged files
git commit -m "<Commit Message>"

# view all of your commits
git log

# view all remote branches
# you are tracking
git remote -v

# add a remote branch using HTTPS protocol
git remote add origin https://github.com/linuxblogger150/scripts.git

# push TO remote repo 'origin', our
# remote branch 'master'
git push origin master

# create keypair
# '/home/rlc/.ssh/github' and
# '/home/rlc/.ssh/github.pub'
ssh-keygen

# cat public key
cat /home/rlc/.ssh/github.pub

# test SSH authentication to
# Github.com
ssh -T git@github.com

# view ALL loaded keys
ssh-add -l

# spawn a new "agent process"
eval "$(ssh-agent -s)"

# add our custom key
ssh-add ~/.ssh/github

# UPDATE origin's URL to SSH
git remote set-url origin git@github.com:linuxblogger150/scripts.git
How do you know if an application is using Delegated Authentication (AuthN):
Simple ☝️
Ask yourself this:
WHO am I presenting my login credentials 🔑 to?
The application itself OR an Identity Service Provider (IdP)?
Examples of an IdP: Google, Facebook, Apple, Okta, etc.
Another hint it’s Delegated AuthN:
Your web browser (User Agent) gets redirected to an IdP for authentication..
THEN, the web browser gets redirected back to the original application.
Tired of typing clear all the time in bash??
clear
Hitting ^L (Control+L) will immediately clear the screen:
Even better, you can clear the screen WHILE mid-typing 😌:
Also, here’s a demo I recorded a while ago on ^L:
