When you’re learning Git (or anything for that matter) rapid and cheap testing, feedback, and failure can expedite the learning process from hours to minutes!
When you’re learning and experimenting with Git concepts like:
- Branching,
- Merging,
- Tagging,
- The Working directory,
- The Cache (or Index),
- Reading the Commit History,
- Or basically any Git command or concept
You want to have the freedom to make mistakes, even to the point of corrupting the entire Git repository (repo).
Essentially, a “Git Repo Sandbox” that you can rebuild in seconds.
Here is my code to quickly (re)create said “Git Repo Sandbox” that contains:
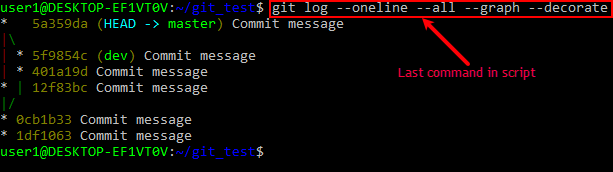
- 2 Branches (master and dev)
- 1 Merge
Just copy and paste the following code into your bash prompt and let it rip.
There is a merge-conflict warning but it’s ignored because all we want is our “Git Repo Sandbox” up and running again:
rm -Rf ./git_test #<== be VERY careful with this line
mkdir ./git_test
cd git_test
sleep 1

git init
echo ":)" >> ./script.sh
git add *
git commit -m "Commit message"
echo ":)" >> ./script.sh
git add *
git commit -m "Commit message"
sleep 1

git branch dev
git checkout dev
echo ":)" >> ./script.sh
git add *
git commit -m "Commit message"
echo ":)" >> ./script.sh
git add *
git commit -m "Commit message"
sleep 1

git checkout master
echo ":)" >> ./script.sh
git add *
git commit -m "Commit message"
sleep 1

git merge dev
git add *
git commit -m "Commit message"
sleep 1

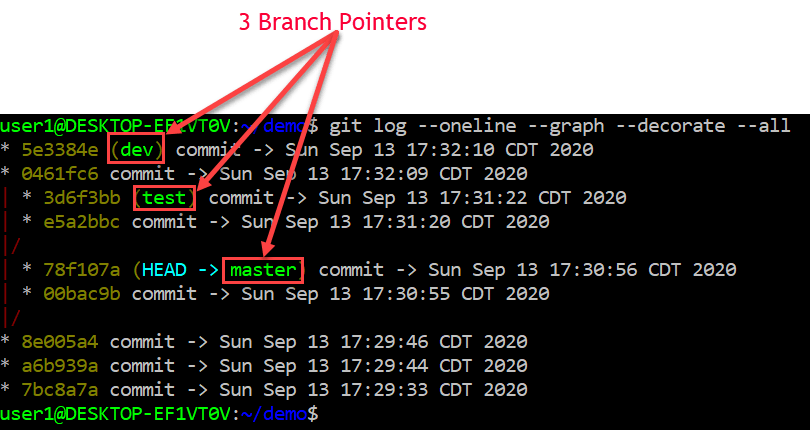
git log --oneline --all --graph --decorate
You will get output similar to the following (only difference is commit hashes):
Here’s a live demo on how to use my code. For me, I performed a Right-click on my mouse to paste:
Now you can study and experiment with as many git concepts and commands to your heart’s content. Or at least, what this simple repository will allow.
You don’t have to worry about making a mistake, because if you corrupt everything, just “re-build and reload”.